I have been baking up a storm with everything from ciabatta bread to bagles, to sourdough. I have always wanted to make sourdough bread since I went to Alaska and just fell in love with the whole frontier culture.
I have been searching through many youtube tutorials, reading many online things, and asking as much as I could. I have finally found my own sourdough path and would like to share it with you.
One of the things about sourdough bread is that it takes time. With most doughs, you can get away with an hour and a half of rising, shaping, etc, and then bake, and voila. But with sourdough, it can take 3 days for all the processes to complete.
The yeast in a sourdough loaf is completely wild and natural, having come from fermented flour and water, as well as bacteria in the air. There is usually no commercial yeast used at all in sourdough baking. (Some recipes do use it but as a general rule, the term “sourdough” refers to the slightly sour and tangy taste in the bread as a result of the sourdough fermentation process of your starter.
There are as many ways to make the starter as there are opinions on it, and it took me a while to sort through all the different styles and methods of the process. I finally settled on a hybrid of 2, and have made my own process that, for now, works well. For the actual starter itself, I bought one from a local bread company as it seemed quite complicated and I wanted to start right away without waiting. I have done more research and I believe making a starter would be fine, but at the time, I was hesitant and wanted to set myself up for success.
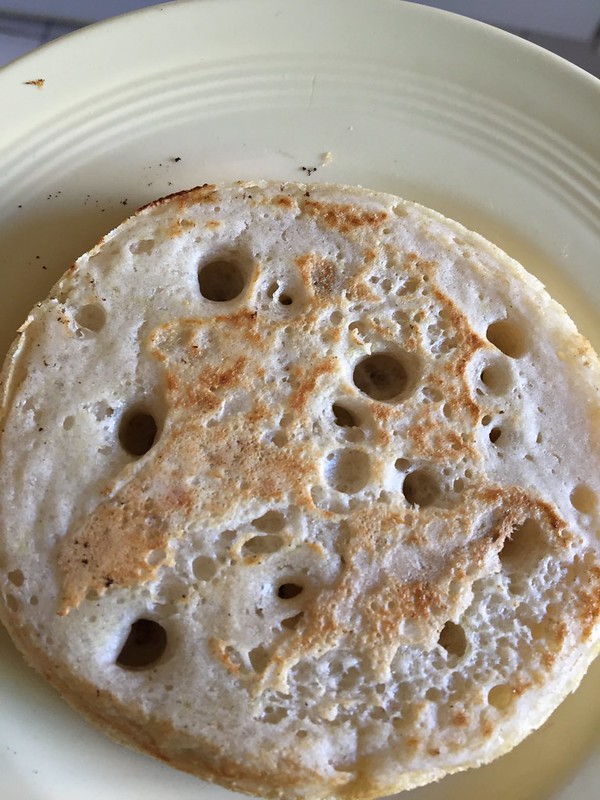
The loaves I make have a decent crumb structure (sourdough crumb refers to the open-ness or air bubbles trapped into the bread), and my structure tends more towards “wild” crumb than uniform bubbles. I actually prefer it, and although there are supposed to be ways you can choose to have either the wild (uneven) or uniform crumb, I am not aware of what it is I do that results in the structure. that is a chapter for next time.
I love the process as it makes me feel like I have accomplished something, even though the process is really very simple and has been successfully used by millions of people for thousands of years. 🙂
The loaves I make are still technically beginner loaves, having only hydration of 80%. Master bakers can even bake up to 120% hydration loaves. The higher the hydration, the more like a batter the is. So imagine trying to shape and fold runny batter. I am still learning how to handle the dough which I am doing better and better each time, but it is a learning curve and one I am happy to be on. One of the tricks os to tighten the gluten membrane around the ball to sort of make it a solid piece.
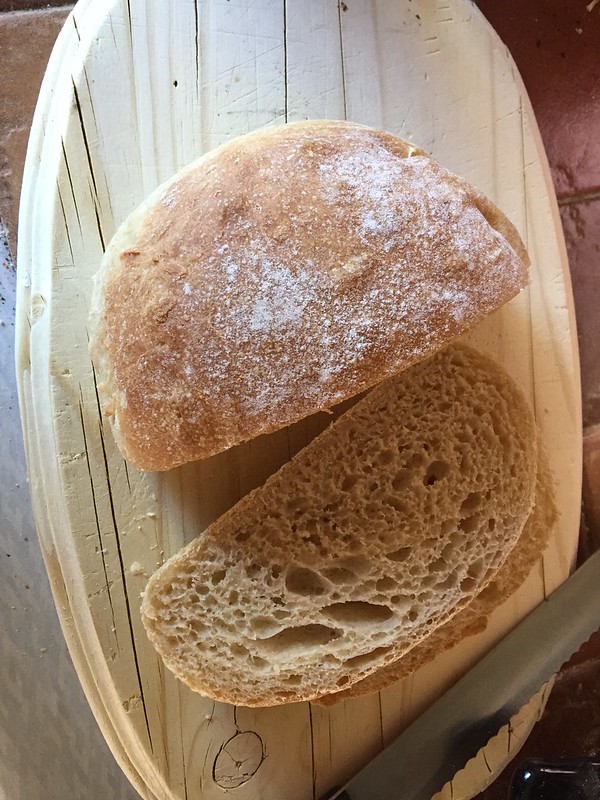
The bread itself is delicious, although it is really best eaten when it cools completely to room temperature. For me, the absolute best thing is the crust. I am not sure about the science behind any of this, or why it works, but the crust forms with a combination of steam and the loaf being closed under a cloche or pot during the first half of cooking. SO far, my crusts have all been glorious.
Here are some of my pics for you to enjoy.


Second sourdough loaf


Each person whose write ups or tutorials I read suggested a bunch of tools divided into two categories – must-haves, and nice-to-haves. I am lucky enough to already have some of the tools from a lifetime of baking, from my Mum and Dad, and from the local charity shop 🙂
I cook the bread on a pizza stone and use the pizza peel to place it and remove it. I consider these essential tools, although I am sure you can do without the,=m if you have to.
Also, because of the hard crust, you also really do need a good bread knife so you don’t cut yourself. Ask me how I know.
I am inspired by Sune – who is Foodgeekk (here). I love his style, and his methods, and I love how he explains everything. There are other styles and other methods out there, but this one works for me. He is dedicated to getting the most out of every ingredient and has lots of converters and tools on his site.
The other person I am inspired by is Gemma at Bigger Bolder Baking (here). Gemma has so many delicious recipes for easy and simple things to satisfy almost any craving, including one mug cakes, made in the microwave. We are a huge fan of these. Her style is gentle and she also explains about all sorts of things along the way to set you up for success.
Both of these bloggers have YouTube channels, and I find that watching a person do something as well as reading how to do it is more helpful than just reading it on paper.
Here is my recipe (taken almost entirely) from Sune, that works for me.
9am, Day 1
Activate your starter
1pm, Day 1
Mix 100g of active stater with 700g of water and mix
Add 850g of flour and 22g of salf and mix just until the ingredients come together. You don’t want to knead at this stage.
Cover with a wet cloth and leave overnight
1pm, Day 2
Divide the dough into two parts and preshape
Rest for 15 – 20 minutes
Shape and place in proving basket
Cover with a plastic bag and place in the fridge for 30 minutes while your oven is heating
Bake at 230 degrees C for 20 minutes covered, and then another 20 to 25 uncovered until brown
To get clarity on how to do these steps, it has taken me several weeks of reading up, and I suggest you go to Sune’s blog and YouTube channel to read up. I am happy to answer questions but am not an expert.
Thank you for popping in, and I hope the lockdown is treating you kindly. See you again soon. XxX